Monday, February 18, 2019

Mad Hatter Cake


Every year for my birthday I enter the Sweet Times of the Rockies cake show and last year I won second place with this Mad Hatter cake! Now you may recognize it as a cake I did on my first attempt at entering a competition, that one didn’t turn out nearly as well and I definitely didn’t win anything at that one but I learned from it and my second try looks way better, right?


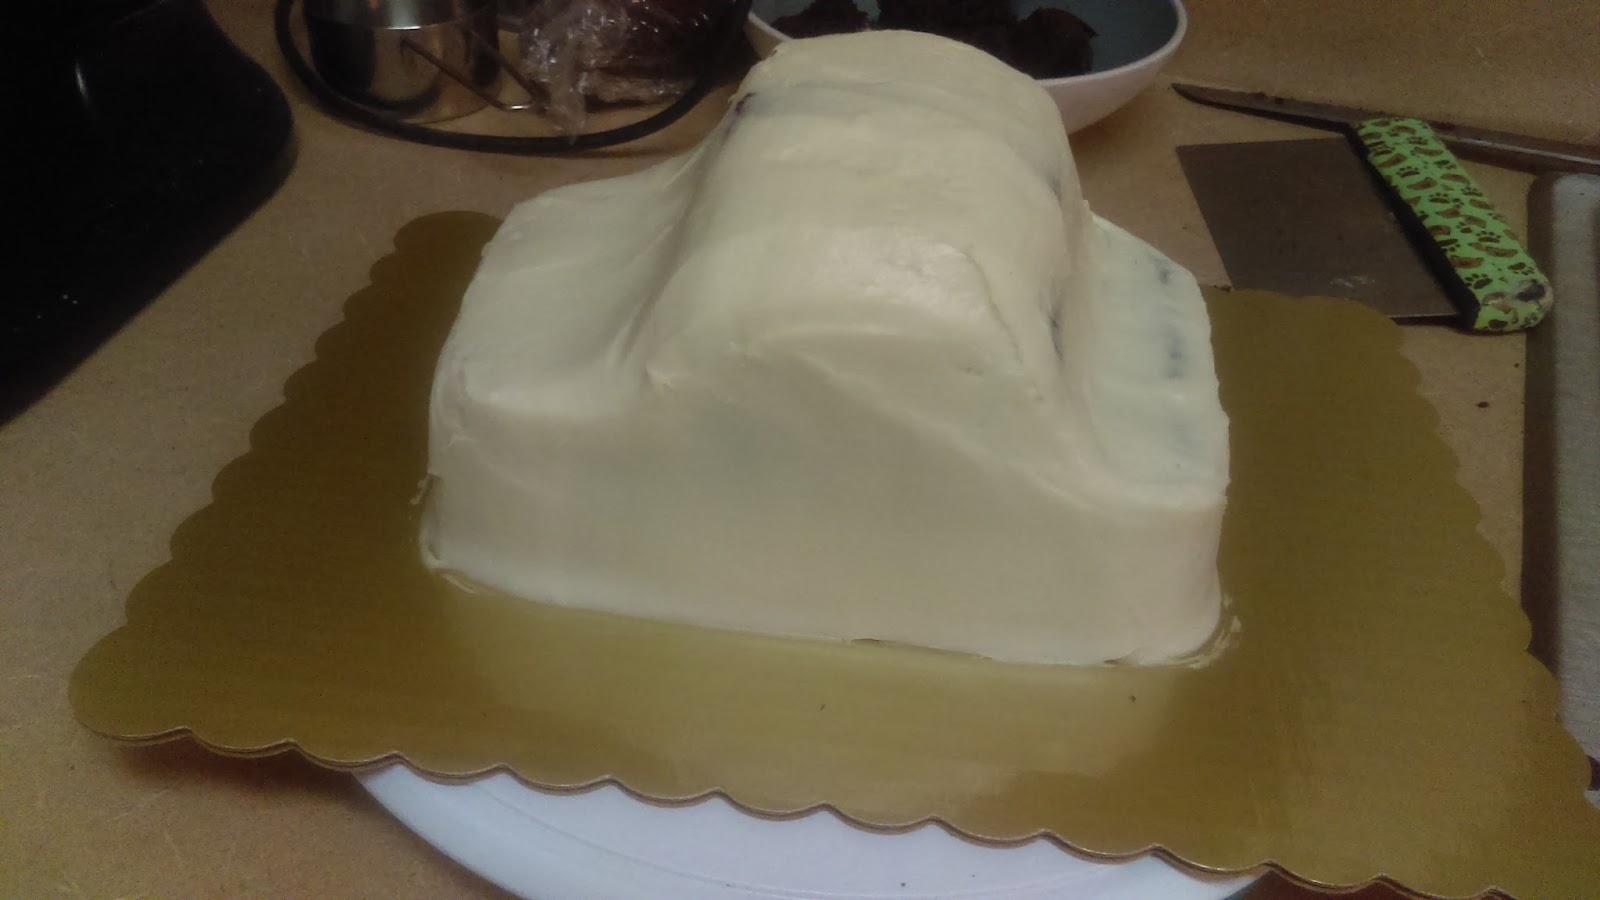
Well to start this is a foam cake, most of my competition pieces are because they stay nicer and keep better in the long run. So I shaved down my foam block so it was round and tapered to a smaller round towards the bottom, then I iced it with buttercream. I let the cake chill in the freezer so the icing would harden before I coated it in fondant.


When coating something that gets smaller at the bottom I find it near impossible to do it with no wrinkles which is what happened in this case but I don’t let it bother me. When things don’t go quite to plan it’s a great time to employ a classic cake decorating trick and hide the defects in this case with a dusty pink hat band. Before I put on the hat band I find it much easier to make my hat brim directly on the cake board and then set the hat cake on top of it. The turns in the brim have to be made before the fondant has a chance to dry. Then I added some gold detailing to give the hat more of a texture using a stencil and a dry gold powder called luster dust.

Only after all that is done could I wrap my hat band around my cake. I also made a cool broach to go over where the band crisscrosses in the back and to cover a rather large tear in the fondant there.

I let the hat dry in front of a fan over night while I moved onto the details I would be adding to the cake. The biggest of these detail pieces was the tea pot and cup which I formed out of rice krispy and coated with several layers of fondant to get them as smooth as porcelain. I let spouts and handles dry completely before I attached them to the china using a bit of royal icing.
Next came the painting which I used blue food coloring and a very tiny paint brush to achieve. I wanted to add a pattern to the pot and cup to give them a more realistic look and bring them together as a set. I chose simple lines and dots so I could easily replicate it over and over but for the shapes that would pull my pattern together I used tiny cookie cutters which I dipped in my blue color before gently pressing them into the fondant. This technique wasn't perfect and I had to go over my lines with a brush to make them more solid but in the end I feel I ended up with a fairly good looking, continuous pattern on both pieces.

There was also orange hair pieces to make which I did by rolling my fondant very thin, cutting strips out of it, and wrapping them around big and normal sized straws. There was also a broach and hat pins to be made which I used different molds to create and put together the pieces using royal icing. To make the hat pin's sticks I rolled out fondant very thin and aloud it to dry but this was a mistake and when I tried to attach them to the cake at the end all the sticks broke and I had to piece them together which didn't give them nearly the height I was going for, next time I'm going to use tiny stir straws as my sticks. There was also a burnt card to be made which I hand cut out of fondant and then painted with black and brown food color to give it the burnt look. I believe it's really the details that bring a cake from 'ok' to 'amazing' and I spent a lot of time putting mine together.

When it came time to attach my details to the cake I used royal icing for my glue. The hat band was too tight and already dry so the card just had to sit on top. My tea pot I really wanted to make pouring tea into the cup so I used some extra fondant in a wedge to prop up the back and put the pot on an angle. I took time and a long straw to create a towering 'pour' flowing into the tea cup but the illusion didn't quite work. I used green buttercream with a leaf tip to create some grass under the tea pot, hiding the fondant wedge, which I stuck molded fondant roses into. My last details were the hat pins which I attached on sight using a straw to poke a hole down through the cake and royal icing to hold it there, as I said my sticks broke several times and I had to simply glue the pins to the side of the cake in the end.


There are always things I would change and do differently when it's my art but this cake won we second place in the Sweet Times of the Rockies cake show and I'm very proud of it. Thanks for taking the time to read about my awesome cake adventures ^^

Thursday, February 14, 2019

Gingerbread Tardis


I missed posting about this years gingerbread house! As per usual I made another amazing gingerbread creation this year but I scaled down from last year and technically I recycled an old gingerbread house from 2014 but I had to make a whole new pattern for it. So take 2 on the gingerbread Tardis, it went better than the first time, turned out cleaner, pattern still needs some adjustments but I like it.


I started by making a plan, using my old pattern I determined all the pieces I would need to construct my tardis. Three walls, 2 doors, a base, corner strips, and outer panel pieces to complete the look. The changes I made from last time include making everything bigger and doing 2 thick pieces on top instead of  4 triangular topper pieces, lastly I had to correct a major error from my last pattern and make sure I had top strips my “Police Box” banners could hang on without interfering with the doors. The next step is making a card stock paper pattern. Now I’ve learned from the past to coat my pieces in a plastic cover but unfortunately I’ve been too busy opening my own business this year and didn’t have time to coat these pieces. As you can probably tell that lead to them getting a bit greasy.

Some other changes I made were cutting out the side panels and corner strips from fondant instead of cookie dough. I did this as a last minute change but the thought process behind it was that the fondant doesn’t expand or change shape due to baking and I figured it would give me cleaner lines. I also made the “Police Box” strips and phone door out of fondant. The structural pieces were all made out of a dyed sugar cookie dough with no baking soda and lots of extra flour. Last time I made my tardis out of a proper gingerbread dough with all the spices but it turned green when it baked and left me with an aqua colored tardis, not good. I also chose to hot melt glue my structure together rather than use royal icing because it dries faster and it was for display only. I did use royal icing to attach all the exterior pieces  which was my next step. You’ll notice that my last minute decision to change the exterior to fondant pieces has made my whole design not quite fit so it will need more reworking at some point. The panel pieces are all one so I used card stock to lift them into place after applying the royal over the window areas and down the sides and middle.


I made the fondant pieces (and baked the cookie pieces) a day ahead of assembly so they would have time to dry. In addition to the side panels and “Police Box” banners I also made a topper light and a phone door. One of these days I’ll actually make the top light up but it was not this time.


My last step was to add fun holiday decorations. The snow is all buttercream and the icicles are royal icing. I used a clay exctruder to make a perfectly even light string attaching it with royal and the lights themselves are chocolate sixlet candies attached with black royal icing. I added icicles to the light strings to add some realism and depth and covered the whole thing in a think coating of powdered sugar. There it is, my second attempt at a gingerbread tardis.

Wednesday, February 6, 2019

Turkey Cake

So I started teaching classes last year and it has been a learning process but enjoyable every step of the way. Some of them are simple like Cake 101 where you learn to stack, frost, and fondant your own cake but others are more complicated like my turkey cake class. I taught this one right before thanksgiving and everyone had an awesome cake to brighten their celebration ^^ The class was a huge success and now I’m gonna lay out how I did it so you too can learn how but nothing is as good as in person instruction so I highly recommend taking one of my classes.

To start I carve the cake into a dome (in this case a foam one for display purposes) using a small knife at a 45 degree angle I went all the way around the top of the cake in a circle, then I made more cuts at various angels to round out the top. Next I took 2 rice krispy treats and formed each into a drumstick shape. I put those drumsticks on each side of your cake, a little towards the back with the skinny sides pointing towards each other. I iced the whole thing with buttercream, an offset spatula, and a lot of patience, after half an hour or so it looked like this. I put it in the freezer to harden up while I worked on the knife.


The knife is made out of fondant but I added some gum paste to it to dry it out faster. I also had to do the knife twice because the first one cracked and broke when I tried to put it into the cake. This is a picture of the first one but for the second I folded in a small straw to give it added stability. The blade can be any size you want but have the straw all the way at the fat end of the blade to insert your handle into. The handle was just hand formed with a toothpick inserted into it so you can attach it to the blade.

Next I covered the whole thing in brown fondant using my hands to smooth it out and get into all the little crevices, cut around the bottom to get rid of all the excess. Use your finger to divide your turkey breast into 2 sections for some added realism. You’ll want to save that extra brown to make a couple of wings which I just hand formed and with some trial and error ended up with a good shape then used some fondant shaping tools to do the feathered bits. I glued them onto my cake with a little frosting. I also made some bone ends with white fondant and the same tools. I cut slices into the skinny ends of my drumsticks and attached my bones to them.


The next step was to use brown food coloring and water to create a nice golden brown, shiny, and crispy looking skin. I used a paintbrush to paint a line of the brown food coloring right down the middle of the divide. Then I switched to water and painted that color down the sides of the cake. I used more brown in all the joins and then water to bring the color around the rest of the cake creating a gradient  over the whole thing and giving it a shiny coating. I also cut a wedge into the back for the stuffing to come out of.

The last bit was to make the stuffing which was just piled up icing with gram cracker crumbs stuck to it. I made some small green peas and orange carrots out of fondant to stick into the stuffing. I cut a skinny wedge section out of the top of one breast of my turkey cake to insert the knife into but I let it dry for 2 days first. I painted it with silver luster dust and vodka after I put it into the cake but you can do it beforehand. The end result was a fantastically realistic looking turkey which I was proud to teach a class on. It took my students about 3 hours to make the cake and then I sent them home with the knifes to insert into the cake as they saw fit ^^ I even had one very creative student who made a rotten turkey with a rat coming out of it (my personal favorite)


Monday, January 29, 2018

Beat Up Car Cake


My little brother has managed to run two cars into the ground before his 18th birthday but for his 17th birthday I mad him this cake representing the beat up second car he got from his friend. It looks a lot nicer now but it drives about as well as my cake LOL


I started with 2 layers of delicious chocolate cake these are 8in rounds but it would have been better if they were bigger. I cut them in half and decided I didn't need the 4th half when I was 'gluing' the cakes to the board. I carved out the front and back windshields.


I put a very heavy crumb coat over the whole thing, this may even be a second coat as I usually double coat my chocolate cakes because of the crumbs.
 
Then came the colored details. I put down the black for windshields first, attached my doughnut wheels next, then went in with the red coating most of the car but leaving the hood and back bumper to be done in gray. This doesn't look like the nicest car but I did it because that's what his car looked like at the time.
Then it was just little car details. I added a thick red icing spoiler to the back, some head lights for the front and back, and a little Ford logo on the front. I used a knife to make etchings in the solid buttercream to give the windows and hood more dimension.


He loved his cake and it lasted only slightly less long then the car did ^.~

Wednesday, January 17, 2018

Pegasus Cake with Meringue Wings

Unicorn cakes are all the rage right now but my mother is a fan of pegasus not unicorns so for her birthday I wanted to make a pegasus cake and I found a great reference picture that did this with meringue wings.
So to start I had to try out the meringue wings. I traced some wings on to a piece of paper and put that under some wax paper. when my meringue was ready I put it into a piping back with a leaf tip. Starting with the longest bottom feathers I worked my way up the wing feather by feather. As I pulled away from each feather it pulled up a little but this adds some dimension to the wings that I liked. I finished the tops with some rosette swirls and baked them on 275 for over an hour.


I had lots of extra meringue so I piped it out into swirls to add to my cake as part of the mane later.


Next came the cake. My mum's favorite is angel food so I actually bought them from the store and let me say that getting them out of those containers in one piece was a challenge. I carved them down into a cylinder and filled the center with strawberries and cream. I gave the whole thing a crumb coat in a Chantilly frosting


For the final coat I used straight whipped cream for a pure white appearance.

I did a little experimenting with the ears trying to dip them after cutting (left) or cut them after the white chocolate had set just a little (right). The cutting after the coat had set was definitely a cleaner look and is now my go to but you have to make sure the white chocolate isn't too hard or it'll chip right off your strawberry when you cut it.


This is the point I got to before I ran out of green buttercream. These cakes always take more icing then I think they will for the hair and since I had no time to go out for more ingredients (and dye) I had to improvise and use my whipped cream to make more green for swirls. It wasn't near as dark and the line is very visible from the top.


My mom loved it and she didn't even notice the flaws although she did remind me that she hates whipped cream (but loves chantilly....so....yeah)

Another successful cake from last year. Wonder what I'll do for her this year....

Thursday, January 11, 2018

Wolverine Cake


Here's another cake from last year. I was commissioned to do a wolverine cake for a friend's son. After talking with the mom about the cake she wanted I came up with this sketch. He likes wolverine but being a classy kid he likes the old wolverine style so I looked up his costume to refresh my memory and came up with this bust style cake. I like this style and it's not something I see a lot of other bakers doing but with cartoon characters it's actually pretty simple.


 I started with he mask  which was made from fondant. I made a paper stencil by tracing his mask shape off a very enlarged photo on my computer. Then cut that out of some black fondant, I like to buy my fondant already colored for black as it is usually darker then I could get it on my own and a lot less work. I put this mask to dry on a cocoa powder can which I determined would be about the same size as my 4in cake I would eventually put it on. I made this a day or two in advance so it would have time to fully dry.


I baked my cakes the day before and let them cool in the freezer overnight. The day of the party I iced my cakes in yellow buttercream. I gave the top cake a little rounded dome since heads tend to be round. I put some of my other icing details on my cakes before stacking them.


Then I added my fondant details which was only the mask and belt.


Finished it up with a few more black icing details to really tie the whole thing together.


I really liked how close to my original drawing this one came out and I know the kid loved it.

Saturday, January 6, 2018

White Chocolate Birch Bark Wedding Cake


So this is a cake I worked on last year for my dear friend Beau's wedding. I always start custom cakes by sitting down with the clients and making a sketch with them. I find out what the client wants and (hopefully) represent what the final product will look like. This way I'm sure we are all on the same page. Beau and Elizabeth were having a more rustic wedding in the cold of a Colorado February and wanted a birch wedding cake.


They didn't like fondant so I offered to do the birch effect with chocolate. I practiced it a few times but the technique is pretty simple. You just melt a small amount of dark chocolate and paint different lines onto a piece of parchment. You could put this in the fridge if you don't want any smearing but I felt the mixing effect would add to the realism. Next you melt a bunch of white chocolate and drizzle it heavily over the lines. Spread the while chocolate with even spatula strokes and if you work side to side with the lines the graying effect looks really good.

These cakes were gluten free chocolate and I filled them with fresh strawberries and iced them in a chantilly frosting (which is really just fancy talk for adding whipped cream and almond extract to your cream cheese icing). I always crumb coat specialty cakes but with chocolate ones it's extra important.


It took up my WHOLE fridge! You can't see it but the top shelf was taken up by all the pans of chocolate. I really couldn't do a larger cake without a bigger kitchen.


This cake was going to Silverthorn so I thought it wise to transport in an unstacked format with zero decoration. I showed up to the event hall a couple hours before the wedding and worked in the kitchen assembling the cake. Stacking went smoothly and it didn't matter so much what the underneath cake looked like (so I forgot to get a picture). I pulled out all my chocolate pieces which I had pre-cut, I felt the strait lines of cutting made for better trees then trying to break the chocolate into right sized pieces. I went around the cake starting at the top putting chocolate piece after chocolate piece. There was a scary moment when I thought they might not make it but they did and the effect was just right. I added little buttercream pine cones but there were no extra flowers to add, the last thing was the topper which I added right before presenting.


It was a great time with great people and I was even there to cut the cake ^^