Wednesday, June 3, 2015

Dr Who Spice Rack

I have this spice rack my grandparents gifted me with one year for Christmas. It is a fine spice rack and Dave and I use it often. Right now we use only 6 or 7 of the spices from the rack and have various other jars and bag around for our other spices. Since the spice rack has 24 jars this makes me thing I need to better utilize my spice rack. I had an idea that if I painted the lids with chalkboard paint I would be able to write on the lids exactly what I wanted and change the things in them as I wanted.


I started by removing all the contents into labeled baggies and deciding which spice I wanted to keep. Then I cleaned the jars which had sat next to our stove for years without cleaning and they had quite the layer of grime.


After the jars and lids were sparkly clean I took the lids and wrapped masking tape around each one so I could just paint the top bit with chalkboard paint.


Next I wanted to give the glass jars a frosted coating for a more sophisticated looking background to paint my Dr.Who Gallifreyan writing on.


 I went to online to find a Gallifreyan Translator since I'm not that much of a geek and typed in the word 'spice'. I tried many different things but this one was just complex enough to be cool but still doable and could fit into the space available. I used a circle template to create the symbol on a scrap of paper I could then slip inside each spice jar. I used a bit of stuffing to keep the paper in place while I carefully traced the design on each jar individually with my glass paint.


It took a few hours for the paint to dry enough to flip the jars over and paint the other side but the slowing bit was my hand and wrist tiring and I ended up doing it slowly over the course of 3 days.


I had already consolidated my spices and decided the 24 spices that would be in my jars. I used chalk to draw on the labels but they can be easily changed.


Now all that's left is putting all the spices back in their jars. I like the subtlety of my custom Dr.Who spice rack it doesn't have to be all blue and shaped like a Tardis despite what the internet will have you believe.

Wednesday, May 27, 2015

Plush Dice Set


I wanted to start getting into making stuffies. I have a lot of stuffed animals but I've never tried making one myself. I though I'd start with something easy, like a set of dice complete with D4, D6, D8, D10, D12, and D20! I found a tutorial online that said basically what I thought, which was, to make stuffed dice you just had to cut out the shape of the die side the number of side there are on said die. A D4 is a triangular pyramid with 4 triangular sides. A D6 is a cube with 6 square sides. A D8 is an octahedron with 8 triangular sides. A D10 is a pentagonal trapezohedron (yeah really) with 10 lopsided diamond sides. A D12 is a dodecahedron with 12 pentagonal sides. A D20 is an icosahedron with 20 triangular sides.


 I made a pattern starting with the size of the numbers I wanted to use, finding a picture of some simple block numbers I thought would be easy to cut out 500 of later. I made both big numbers for the single digit dice and small numbers for the dice going into double digits. Then I used these to size the shapes for the sides again finding templates (shapes) online. My patterns can be seen here.

Now I needed to find cool fabric to make my dice out of and some plain fabric to make my numbers out of. I went rooting through my fabric box and found some cool ones, a maroon and a blue cotton, a dark blue and a light purple satin, and I also chose a fabric I had a lot of to make a test die of each type out of, a black swede. I cut out each side individually pinning the patten onto the fabric each time and removing the layers when they became too thick (it was quite a lot of sides).

Next I began pinning and sewing the sides together in the fashion of these paper dice (Dice Template). I started by just doing one of each die in my test fabric, the black swede.


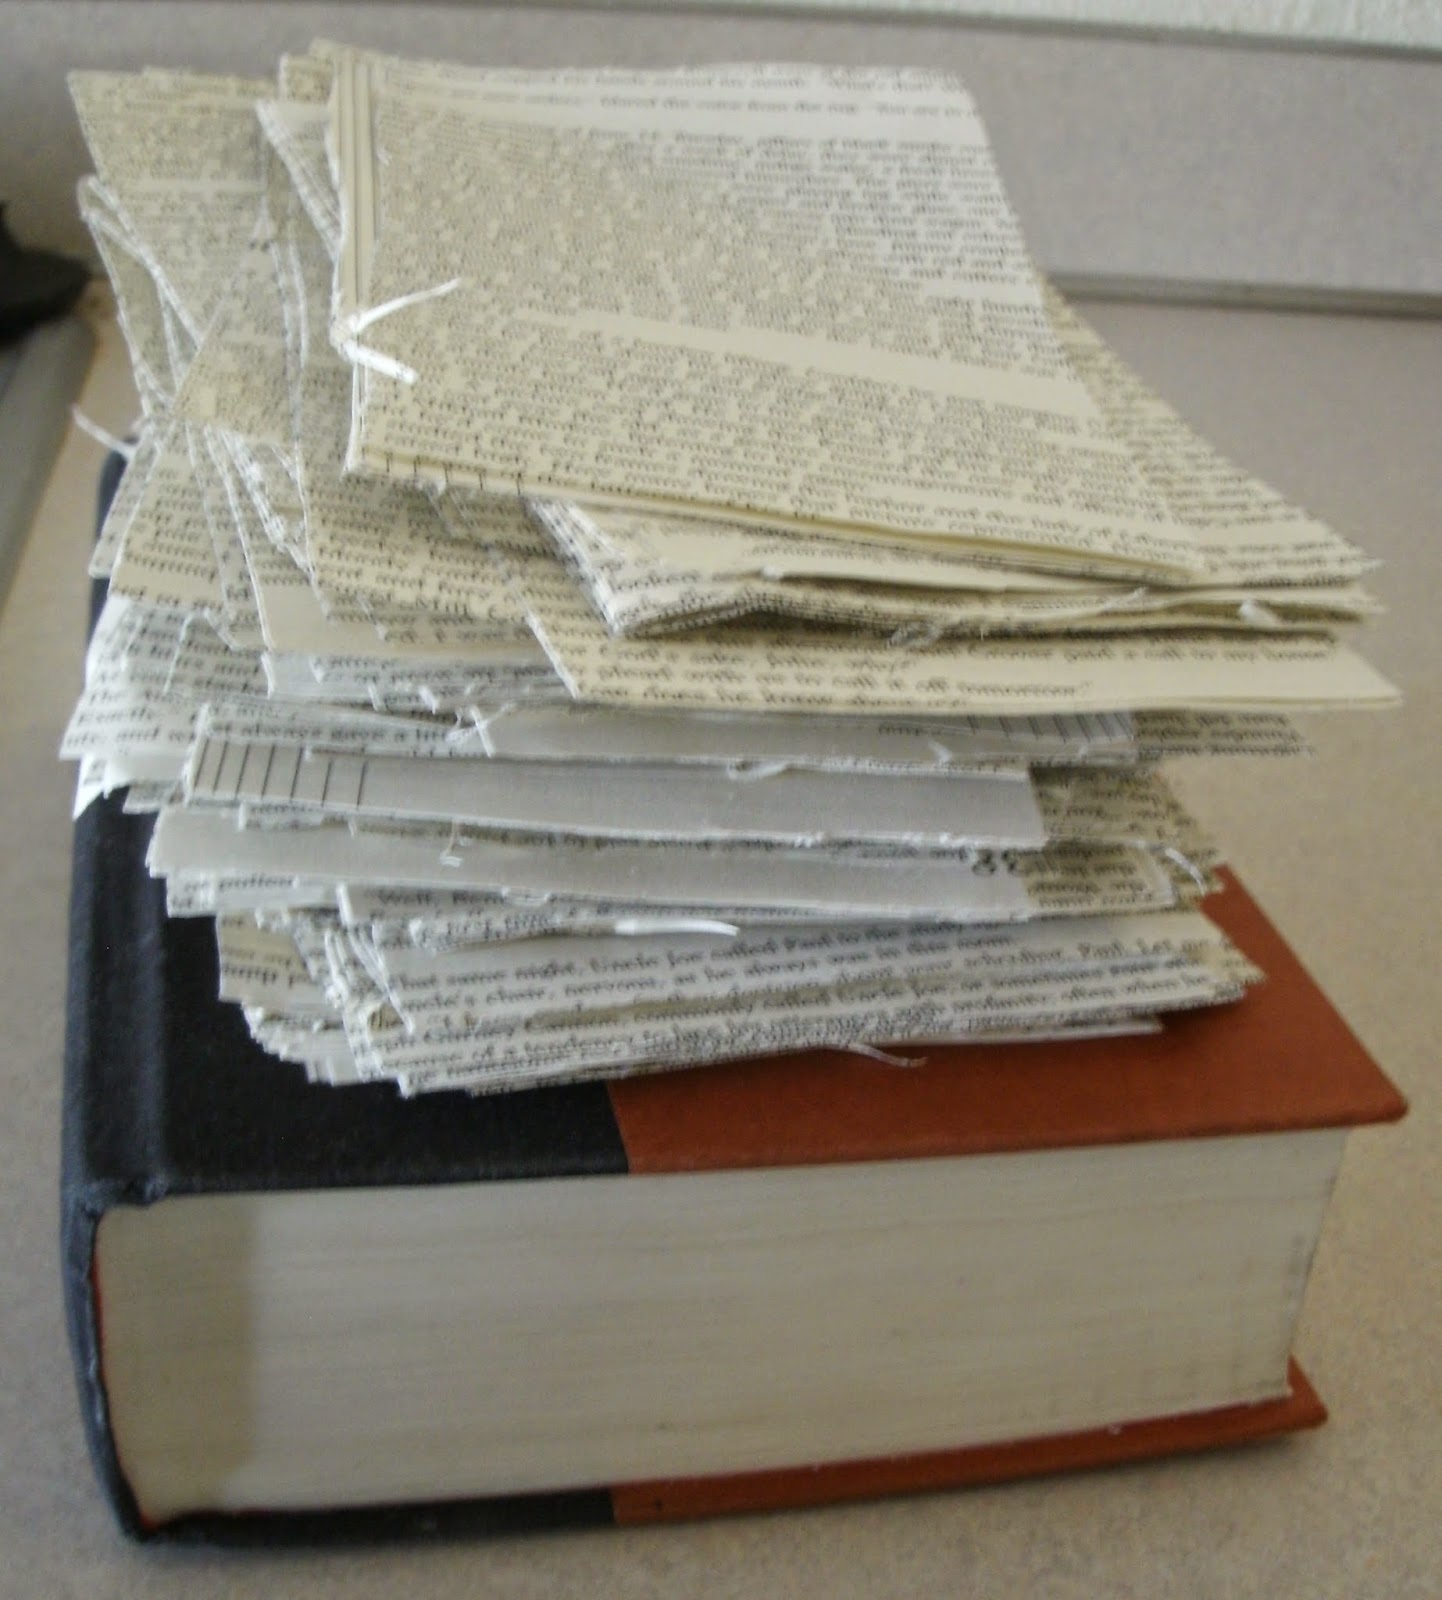
Next I went to the fabric store for 'Pellon Wonder Under' which is a magical tool you can iron onto a fabric of your choosing, cut out the shape you want, peel off the backing, and iron onto whatever you want! I added up all the numbers of all the dice I was doing and calculated how much space they would take up and figured that I would need like 8 yards of this stuff, but this was assuming I spaced them out to take up as much space as the largest number. I ended up finding this 'Heat-n-bond' stuff that is exactly the same, but cost like $2 less at the store, and decided to only get 5 yards knowing I would draw my numbers as close together as possible. I drew all the numbers on the paper side starting with the ones so they could lay flat against the sides and stack closely together. I would scroll the paper up as I went along to make it easier to handle. I had already figured out how many of each number I needed and wrote that number on my pattern. I kept track of how many I had already drawn by giving it a number designation in the corner. I cut the Heat-n-bond as long as I could fit on my piece of fabric and then ironed these big strips onto my white fabric.
Now I began cutting these numbers out. This mostly took time, a lot of patience, and a tiny pair of scissors. I cut out over 400 numbers with 250 of them being the small numbers. You may notice that they are all backwards (you may also notice the big sevens aren't, I had to redo them) The reason being that to apply them to my dice I will peel off the paper side you're seeing and place that side onto my dice sides. I placed the numbers as seen in my dice template, checking and double checking that I had one of each number and that they were all there. I carefully centered each number, taking into account the seems I would be sewing on all sides. Then I ironed on each number individually moving along slowly and making sure I gave each number enough time to fully stick. It was very easy to do with the black swede fabric as it was dark and the white fabric for the numbers was thin so the numbers would get darker when they were fully set.
 Being the first time I've used this stuff, and because it does, in fact, say 'iron on and then sew' I didn't know how well they would stay on but I didn't want to sew all of them if I didn't have to. These being my test runs I tried many different stitch patterns around all the edges of the numbers. I chose to do it in black thread cause I was hoping to add some interesting detail but most of the stitching looks sloppy and better off hidden in my opinion. I then sewed these together into their shapes, the D4 and D6 being the easiest to logically figure out I started there bring sides closest together, pinning and sewing each one at a time, keeping all the numbers on the inside of course.


Don't forget to leave a small opening in your last side so you can turn it inside out as I've done here though I would recommend leaving them tuned in for washing (as I did).


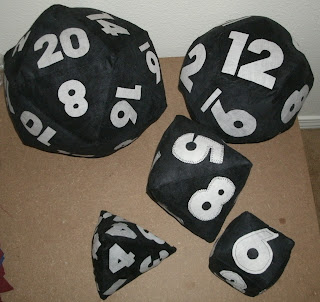
After washing them (because the black fabric stunk something awful) I turned each inside out and began stuffing them. The bag of stuffing came with a stick that looks identical to a chopstick but there was only one of them. I used to to make my corners nice and pointy and I tried to use it to shove stuffing into the corners once the dice were mostly stuffed. The small ones turned out quite well but the bigger ones seem more beach ball, they are all roll-able, useable, plushy, dice though!

Saturday, April 4, 2015

Easter Eggs!!!

I haven't posted in awhile and I've been lagging behind in my crafting. So today I'm gonna start out small and make some fun easter eggs, tis the season after all. I found this picture of tie-dyed easter eggs and the description made it sound really easy, not to mention I already had everything I needed. To start I hard boiled the eggs to an easter bunny approved level of firmness (20mins). Then I ran cold water over them until they were cool enough to touch, drained the water, and gave them some time to dry a little. All you need for this is a paper towel, vinegar, food coloring, and eggs!
Soak the paper towel in the vinegar, I tried this once ringing it out and once not, doesn't seem to make much difference. I laid it out in my Pyrex baking dish to same my counters when I dripped food coloring on the soaked towel.
Then rolled the eggs individually in my 'tie-dye' sheet.
 Let it sit for a few seconds and done! I said it was super easy...

Tuesday, March 10, 2015

Book-Safe

I love making book-safes and I have made no less then 8 so far. I find them to be eternally useful and a cool decoration for anywhere. They're also super easy and cheap to make. I've made them for gifts to family, as unassuming safes for money (mostly just my foreign change), and this one I'm hoping to make as a keepsakes box for all the stuff I brought back from France.
I started by going to the thrift store and getting a book, any old book will do as long as it's hard cover and big enough to fit what you want to put inside. I first selected a book that, after reading the dust cover on, I couldn't cut into until I read so I had to select a different book that I had no interest in. I also needed some claps, I chose some plastic spring clamps but I've done this before using my parents C-clamps. Lastly you need glue and some foam brushes, I already had Mod Podge at home but Elmer's glue would have worked just as well.

I started by removing the dust cover and lightly gluing the last page of the book to the back cover. I did this for the last 5-10 pages and then flipped the book over. I usually like to leave the first few pages of the book loose for whatever reason, so after choosing which page I wanted to eventually cut into I left the few aside and clamped the corners of the rest of the book. I then went around with my glue and coated the outside of the pages. You might have to release the clamps and really press the glue in there depending on the book, just make sure it's good and coated. This is gonna have to sit and dry for awhile, I left mine for a couple of hours before removing the clamps. I also placed a pencil case under the feet of the clamps so they wouldn't make indentations in the pages, which I've had happen before.
Once the glue was dry, and I had a day at home, the next step is cutting out the safe. I started by drawing the dimensions on the contents page, using my ruler I marked 1in in from the edges and just far enough in to cut out all the words on the contents page. Then I took my exact-o knife and cut down into the book removing a few pages at a time. The key to this is patience, I work slowly cutting out just a couple pages at a time, making sure my corners are well cut and my edges straight.


I did this over the course of two days as it does make my fingers really sore.


Now I need to glue the inside like I did the outside, I did this in two parts, the back spine bit first and the front bit second allowing time to dry in between. I have lined this inner cavity with fabric or felt before, it's pretty easy if you just lay the fabric in when the glue is sticky and cutting out the extra corner bits, but I'm not going to do that for this one since the edges turned out so straight and nice. 


So my next step is decorating the cover. The look is really up to the creator and I've left them plain or created intricate designs. This one is going to have an old world style with purple (my favorite color) tissue paper decoupaged over the top. I cut out these pieces from some cardboard drawing the design on some scrap paper to decide how big and what it should look like before cutting the cardboard. Then I glued them to the front of the book, eye balling whether it's centered.


Then I coated the top in mod podge and laid my first sheet of tissue paper over it pressing into the corners and not worrying about tears. I layered on a couple more pieces til I felt you couldn't see the different colors underneath.


Next I wrapped the edges around the front cover. I let this dry for awhile before moving on and doing the same to the back.


My last step was creating an interesting cover. I really liked the guy on the original dust cover so I decided to cut him out and use him. I also wanted a label for the front.


 And it's done!

Monday, March 2, 2015

MUNNY

Last week I got my Lootcrate in the mail and it had in it this little munny doll which you are supposed to decorate up however you want. I immediately decided to turn mine into The Doctor. Which doctor, you may ask? The best one! David Tennant's 10th Doctor.


I started by using the wash off markers that came with the doll to sketch what I wanted it to look like, drawing inspiration from online, I sketched this onto my Munny.


I had some clay and thought I'd give it some 3D effects (and a little sonic screwdriver) with the clay.


I had intended to paint it all over with the appropriate colors but then I had this idea to just leave the nose and paint the body with the suit but make the head all skin tone. The idea being that I could give him different clay hair styles as I liked. This is after my first round of painting.


Then I went in and did some more detailed painting and used a sharpy for all the black lines.


Then I spent like an hour giving him this awesome hair style...and then realized I hadn't given him eye brows till the next day.

Tuesday, February 24, 2015

Thrift Store Cake Stand

As many of you probably know I'm a baker by trade but I currently own no cake stands with which to display my cakes. This week I've decided to remedy this blatant error in my serving dish selection. Store bought cake stands can be expensive or cheap and flimsy, but Pintrest is filled with these 'take thrift store dishes and make stands' ideas and they seem really simple. I decided to create two pieces, one is going to be a simple cake stand of a flat dish on a low base which I intend to be all gold at the end of this, and the other will be a 3 tiered cupcake/cake stand with a flat bottom flat on the table with two glasses with plates on top of each.
My first step was going to the thrift store, located a convenient 7 minute walk from my house. I selected 4 plates of varying sizes including a large microwave plate for the bottom tier, and 3 glasses which I found these two spindly ones that I like the shape of the cup but they may be too delicate.
I also stopped buy the store to pick up some heavy duty glue and spray paint. I already had black and gold spray paint that wouldn't be perfect for this but they would work well enough. I picked up a can of spray paint that I hope will adhere to the smooth glass surfaces and give them a little texture for my other paints to grip.


 Step 2 was cleaning the dishes since they were from a thrift store and probably dusty and dirty. The simple cake stand is going to be all gold so I glue the pieces together before spray painting.


The other cake stand was going to be gold and black so I left the pieces separate for painting. I started by painting everything with my frosted glass coating that at first I wasn't sure was working but did give the pieces a little bit of texture.

Then I painted the simple cake stand gold and painting all the plates for the other stand gold and the cups black. I left no less then 30 minutes between coats and I only needed one coat on each side with some touch ups on rims and such.

Step 3 is gluing the tall cake stand together. I glued the glasses in the center of the bottom of the two smaller plates using the good old fashioned method of eye-balling it.


Once they were set I turned them over and set the taller of the two in the center of the big microwave plate marking the rim with pencil I turned it back over and carefully applied my super strong epoxy to the rim of the glass. I turned it up side down on the plate matching it up with my markings. Then I repeated the process for the next plate.


 I baked some cupcakes to show off my awesome new cake stands!!!